In this article, I explored ways to extend my LLM with knowledge specific to analyzing Intel Processor Trace.
“To me the question is what happens next. And there are three things that are happening this year. The first is infinite context-window.”
– Eric Schmidt, Ex-Google CEO
Source: The 7 Things Everyone Needs to Know About AI Right Now: Superintelligence
In Part 1 of this series, I introduced the concept behind this project: to fine-tune an open-source LLM to process massive amounts of Intel Processor Trace. This has the potential to apply to many use cases: at-scale bug triage, codebase vulnerability scans, malware detection at the point of execution in RAM, and many others.
As such, I’ll chronicle the journey of discovery as I develop this solution over many months. I’ll need to become a bit of an SME for LLMs, and combine that with my current knowledge of x86 architecture, UEFI, and OS internals.
In this article, I’ll cover the following topics:
- Simplify my Python coding environment
- Parameters versus Tokens – a short description
- Using a Modelfile to customize LLMs – first steps
Simplifying Python Coding
I ended Part 1 with writing some Python code that connects with a local LLM, delivers a payload (the prompt) via an HTTP POST, and prints out the response. It’s pretty low-level, complex code. You can simplify this code by using the ollama Python package, obtaining that module via:
>pip3 install ollama
And then the code becomes much simpler:
import ollama

#Initialize the Ollama client
client = ollama.Client()

# Define the model and the input prompt

model = "mistral"  # Replace with your model name

prompt = "What is PL/I?"

# Send the query to the model

response = client.generate(model=model, prompt=prompt)

# Print the response from the model

print("Response from Ollama:")

print(response.response)
For now, I’ll continue the development on my local hardware, so this will be the approach for a while. I may have to change my strategy when I move to Google Colab or some other platform going forward. We’ll see.
Parameters versus Tokens
Before continuing the description of the fine-tuning process, I’ll take a detour into two very important LLM concepts: tokens and parameters. While this article is not an LLM tutorial, understanding these basics is essential for adapting an LLM to specific tasks, such as interpreting instruction execution traces in UEFI.
To put it simply, tokens are the basic building blocks of text that an LLM reads and generates. They are the model’s “words” or “letters.” A token can be a single word, a part of a word, a punctuation mark, or even a space. For example, the sentence “I love my dog” might be broken down into the tokens: [“I”, ” love”, ” my”, ” dog”].
Parameters, on the other hand, are the model’s knowledge and learned relationships. They are the numerical values (weights and biases) that the model adjusts during its training to become more accurate. Think of parameters as the “neural connections” in the model’s brain; I like that analogy.
A good way to compare the two is in this table:
| Aspect | Tokens | Parameters |
| What they are | The units of text being processed | The model’s internal knowledge and weights |
| Measurement | Counted per interaction (input & output) | A fixed, static number for a specific model |
| Function | The “what” of the conversation (input/output) | The “how” of the model’s intelligence |
| Analogy | The words you speak and hear | The knowledge in your brain |
For tokens and parameters, in general, the larger the better. We often talk about the LLM’s “token context window” as a key means by which a model can retain “in memory” massive amounts of data that we send it; retaining earlier parts of the data without losing context.
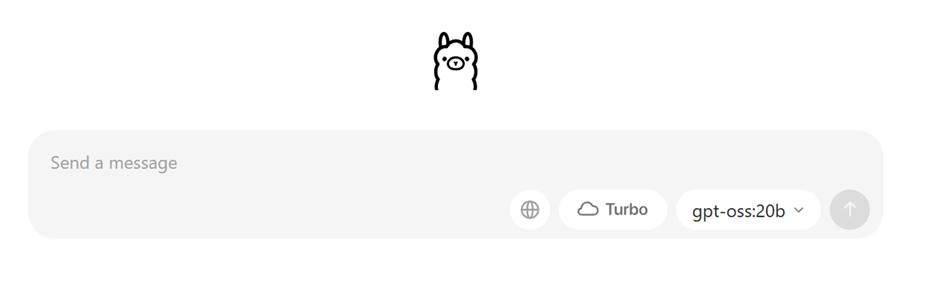
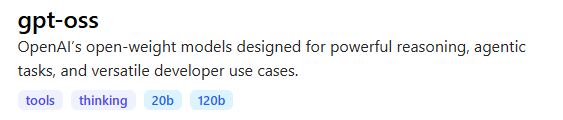
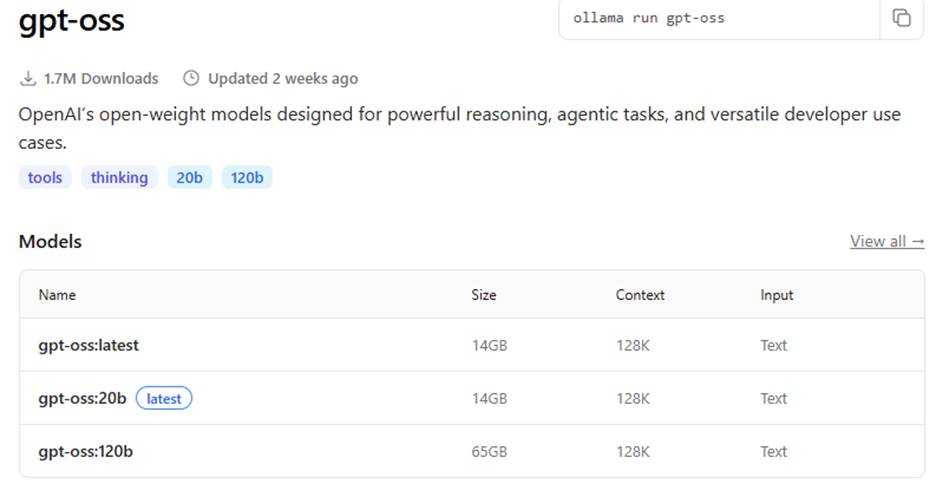
Determining the number of parameters of any given LLM can easy. It’s a fixed characteristic of the model. If you’re working with https://ollama.com/search, you’ll see it’s sometimes displayed in the description of the model; in this case, gpt-oss has two versions available, one with 20 billion parameters, and a larger one with 120 billion parameters:
But as noted in the ollama GitHub repository, https://github.com/ollama/ollama, the bigger the model, the more RAM and disk space it’s going to take. Here are some examples:
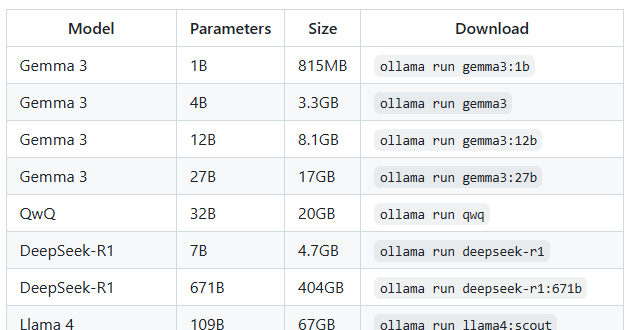
And further, you should have at least 8 GB of RAM available to run the 7B models, 16 GB to run the 13B models, and 32 GB to run the 33B models.
Since my local PC is a 16-thread AMD Ryzen 7 1700X CPU, 16 GB RAM, NVIDIA GeForce GTX 1060 with only 6GB VRAM, I’ll need to stick with models that have significantly fewer than 7B parameters.
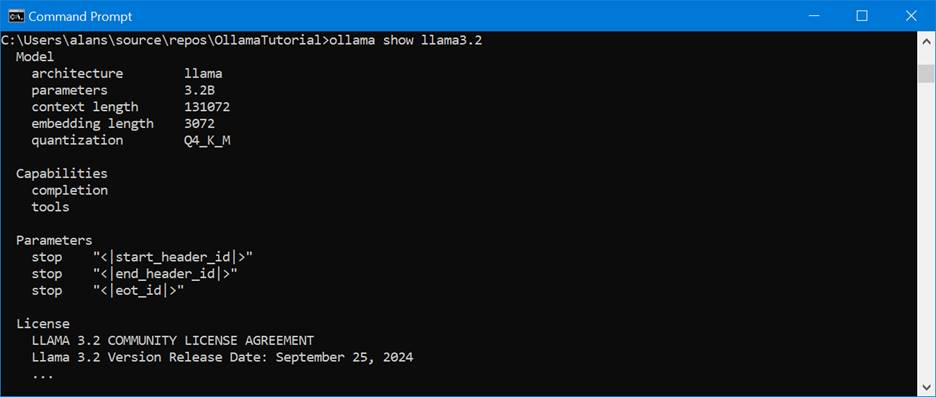
Determining the context window can also be found by accessing the model repository, for example:
Or once you’ve loaded the model onto your local machine, the “ollama show <model_name> will display it as well:
Of the models that I worked with in Part 1, here’s a summary table of their tokens and parameters:
| Model | Context | Parameters |
| mistral | 32,768 | 7.2B |
| llama2 | 4,096 | 6.7B |
| llama3.2 | 131,072 | 3.2B |
Keep in mind that the context window represents the maximum number of tokens that can be accommodated in a single interaction; including the prompt and its response. This makes sense, based on what I’ve learned about LLM tokenizer design.
In my webinar video, Advanced Threat Analysis and Reverse Engineering using AI, IDA, and the SourcePoint JTAG Debugger, I worked with 100 million lines of Intel Processor Trace, which took up about 8GB of disk space. I had to compress it using 7-Zip to about 500MB, as ChatGPT has a hard limit on file size and tokens supported. When queried, it informed me:
Uploading and analyzing an 8 GB / 107 M-line .txt in one go isn’t possible in a single ChatGPT Plus session.
ChatGPT file uploads have a hard per-file cap of 512 MB and text/doc uploads are limited to ~2 million tokens per file (far smaller than your 8 GB trace). The blocking issue is the per-file 512 MB and 2M-token caps, which apply broadly—not just Plus. Pro/Enterprise mainly increase file count/quota, not the single-file size/token limit.
My current context window is about 128k tokens (roughly 400–500 pages of text). That’s the maximum amount of text I can keep “in working memory” at once when analyzing a file or conversation.
Very interesting. For now, I’ll focus on the token context window as a key aspect that I want to increase in size. Since I’m using an open-source model on my local PC, I’m looking for the largest context window that will fit into its constrained space. In an upcoming article, I’ll refer back to Arthur Rasmusson’s use of Paged Attention over RDMA as a means to expand the context window for Intel PT.
Here’s an important caveat: even though the context window may be quite large, the ollama platform may default it to be lower (often 2,048) to save VRAM. For customization, you will want to tune this; see the next section.
Using a Modelfile to customize LLMs
One of the means of customizing an LLM in the ollama platform is with the use of a Modelfile. This is a little text file that can modify an existing base model and creates a more specialized model.
The use of the Modelfile is covered lightly in Tech with Tim’s video, Learn Ollama in 15 Minutes – Run LLM Models Locally for FREE. In this instance, we’ll use the following Modelfile to modify the base llama3.2 model:
FROM llama3.2

# set the temperature to 1 [higher is more creative, lower is more coherent]

PARAMETER temperature 1

# set the system message

SYSTEM """

You are Mario from Super Mario Bros. Answer as Mario, the assistant, only.

"""
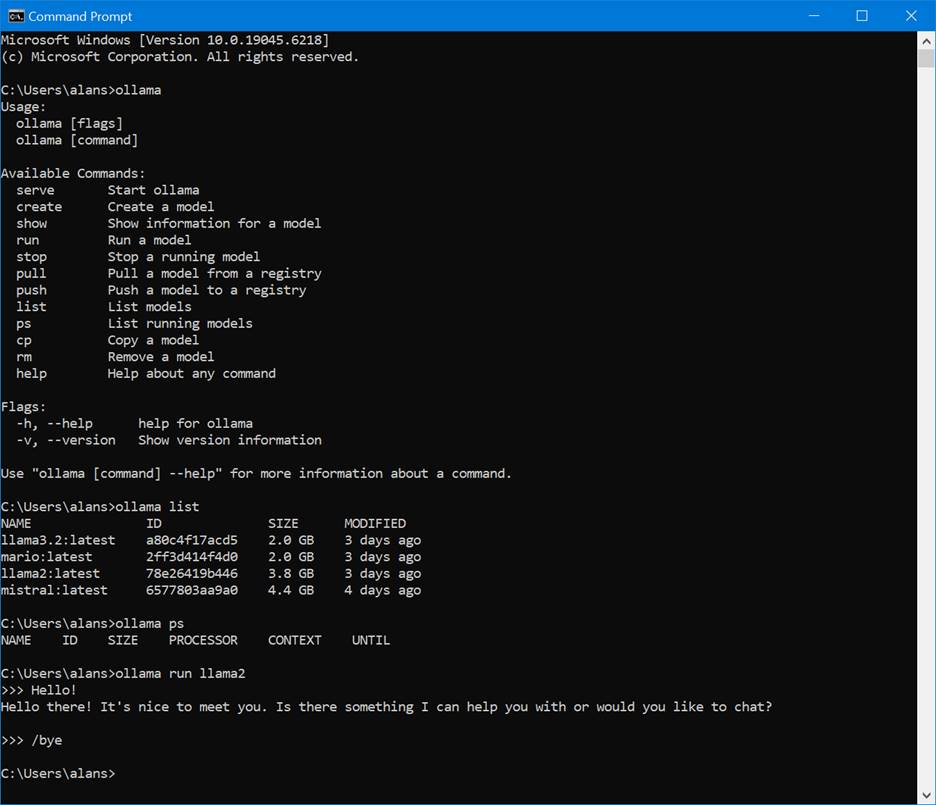
Run the following from a CMD prompt to change the model’s behavior and watch it act like Super Mario:
>ollama create mario -f ./Modelfile

>ollama run mario

>>>Hello

It's-a me, Mario! *moustache twirl* How can I help you today?

This is a simple example, so let’s dive in a little deeper to see what more interesting things that we can do.
Here’s a table of attributes that can be changed within a Modelfile:
| Attribute | Description | Default Value |
| FROM | This is the mandatory first instruction that specifies the base model to use. It tells Ollama which pre-trained model you are building upon, which can be a model from the official Ollama library (e.g., llama3:8b) or a local .gguf file path. | N/A (Required) |
| SYSTEM | This sets the system prompt, which is a set of instructions that the model will follow as its core programming or persona. It’s a powerful tool for defining the model’s behavior, style, and constraints (e.g., “You are a helpful coding assistant who explains concepts clearly with code examples.”). | None (models may have a built-in system prompt) |
| TEMPLATE | This instruction defines the full prompt template that is sent to the model. It controls how the system message, user prompt, and model response are structured. This is essential for models that require a specific format to understand the conversation flow correctly. | Varies by model |
| PARAMETER | This instruction allows you to set a wide range of generation parameters that fine-tune the model’s behavior and output. The most common ones are: • temperature: Controls the creativity and randomness of the output. A lower value makes the model more deterministic and factual, while a higher value encourages more creative, diverse, and unexpected responses. • top_p: Defines a cumulative probability cutoff for selecting the next token. A lower value selects from a smaller, more focused set of tokens, leading to more conservative responses. • top_k: Reduces the probability of generating “nonsense” by limiting the model’s choice to only the k most likely tokens at each step of generation. For example, if top_k is 10, the model will only choose from the 10 most probable next words. • repeat_penalty: Penalizes words that have appeared recently in the conversation. A higher value strongly discourages repetition, which is useful for preventing the model from getting stuck in a loop. | temperature: 0.8 top_p: 0.9 top_k: 40 repeat_penalty: 1.1 |
| ADAPTER | This instruction is used to apply a LoRA (Low-Rank Adaptation) adapter to the base model. LoRAs are small, fine-tuned files that can add a specific skill or knowledge set (e.g., a specific writing style or technical expertise) to a model without requiring you to retrain the entire model. | None |
| LICENSE | This is a metadata instruction that allows you to specify the legal license under which your custom Modelfile and the resulting model are released. This is important for ensuring proper usage and distribution. | None |
| STOP | This attribute defines one or more stop sequences. When the model generates any of these specific strings, it will immediately stop generating a response, which is crucial for managing conversation turns and avoiding unnecessary output. | Varies by model (e.g., \n[INST], `\n< |
| MESSAGE | This instruction allows you to add pre-defined messages to the model’s history. You can use this to establish a specific conversational pattern or to pre-load a context for the model to work from before the user even starts chatting. | None |
The PARAMETER and ADAPTER attributes are the most interesting ones in the context of this article.
For completeness, here’s a complete list of generation parameters (hyperparameters) that are supported by PARAMETER within Modelfiles, with a brief explanation of what each one does:
- mirostat: Enables Mirostat sampling, an alternative to top_p and top_k. It is designed to control perplexity, balancing the coherence and randomness of the output. The value can be 0 (disabled), 1 (Mirostat), or 2 (Mirostat 2.0).
- mirostat_eta: A learning rate parameter for Mirostat sampling. It influences how quickly the algorithm adjusts to the generated text. A higher value makes the model more responsive to feedback, while a lower value makes adjustments more slowly.
- mirostat_tau: A target perplexity parameter for Mirostat. It controls the balance between coherence and diversity in the output. A lower value leads to more focused and coherent text.
- num_ctx: Sets the size of the context window in tokens. This determines how much of the previous conversation or prompt the model “remembers” when generating its next response.
- num_gqa: The number of Grouped-Query Attention (GQA) groups in the transformer layer. This parameter is required for some model architectures and is used to optimize performance.
- num_gpu: Specifies the number of layers of the model to offload to the GPU(s) for accelerated computation. Setting it to 0 will force the model to run on the CPU.
- num_predict: The maximum number of tokens to predict and generate in a single response. A value of -1 allows for infinite generation, and -2 fills the entire context window.
- num_thread: Sets the number of threads used for computation. By default, Ollama automatically detects the optimal number for your system’s performance.
- repeat_last_n: Defines how far back (in tokens) the model should look to apply the repetition penalty. A value of 0 disables the penalty, and -1 looks back at the entire context.
- repeat_penalty: A multiplier that penalizes tokens that have appeared recently in the output. A higher value (e.g., 1.5) will more strongly discourage repetition.
- seed: Sets the random number seed for generation. Using a specific seed ensures that the model will produce the exact same text for the same prompt, which is useful for debugging and reproducibility.
- temperature: Controls the creativity and randomness of the model’s output. A value of 0 makes the output deterministic and factual, while a higher value leads to more diverse and creative responses.
- tfs_z: Stands for Tail Free Sampling. This is a method to reduce the impact of less probable tokens. A higher value reduces this impact more, while a value of 1.0 disables it.
- top_k: Limits the pool of potential next tokens to the k most likely ones. This helps prevent the model from generating random or nonsensical text.
- top_p: A more dynamic alternative to top_k. It selects the smallest set of tokens whose cumulative probability exceeds the value of top_p. This balances diversity and quality.
- min_p: An alternative to top_p that ensures a balance of quality and variety by setting a minimum probability for a token to be considered, relative to the most likely token.
Note the num_ctx generation parameter. We’ll need to use that.
I’ll demonstrate the use of the PARAMETER and ADAPTER features in an upcoming article.
I’ll also cover the SYSTEM feature in the next article, as I modify the model’s behavior to act like an x86 and Windows internals expert (with some forthcoming training from me, of course).
As a final note, I should mention that Arthur Rasmusson suggested testing my LLM with TensorRT-LLM and using the KVCacheTransferManager. Since the ultimate goal of this project is to train an LLM to process huge amounts of Intel Processor Trace, this seems like a good direction. TensorRT-LLM is an NVIDIA open-source library that accelerates LLM inference, and KvCacheTransferManager, a memory management system for efficient handling of large token context windows, is a core part of it.
Also, Arthur mentioned that it might be possible to run NVIDIA’s GPUDirect Storage on the RTX 1060 in my aging workstation – this is a mechanism that expands limited VRAM memory via a direct pathway between it and external memories, which will be essential to create the massive context window I’ll be needing for Intel Processor Trace – how cool would that be.
This is going to take some study on my part, as these tools aren’t for the faint of heart, but I’m looking forward to it.